Loading...
Ezy-as Applicator Handles
Sold out
€24,00
Unit price
/
Unavailable
Tax included, shipping and discounts calculated at checkout.
Ca-mi | SKU:
971970847
Notify me when it's back in stock!
Write us your email, you will be notified when this product becomes available again!
Ezy-as Applicator Handles is backordered and will ship as soon as it is back in stock.
Shipping Costs and Times
Shipping Costs and Times
- Order fulfilled in 24h
- Italy, including islands, Free from €49.90
- Orders under €49.90: €4.99
- Europe starting from €11
Payments
Payments
Payment information is processed securely. We do not store credit card information or have access to your credit card information.
Returns and Refunds
Returns and Refunds
You can return and receive a refund for the item within 30 days. See full policy here.

Do you need help?
Our customer service is here to help you!
- Contact us by phone, email or WhatsApp, from Monday to Friday, from 9:00 to 20:00 .
- For common questions, such as tracking your order or checking its fulfillment status, you can count on our artificial intelligence , available 24/7 .
We are always at your side to offer you fast and effective support!
Description
Description
EZY-AS APPLICATOR HANDLES
ezy-as
HANDLES
• For open and closed tips;• easy to use and wash;
• compact and lightweight;
• color-coded measurements;
• sturdy and durable;
• easily transportable.
Universal, patented and very practical applicator, designed for those who have difficulty wearing open or closed toe medical compression stockings, armbands with or without gloves, or tubular bands, avoiding interference with any dressings.
The product is available in 3 sizes, distinguishable by color.
It is compact, lightweight, easily transportable, very easy to clean, sturdy and does not rust.
It is purchased only once and used for a long time, taking care not to expose it to temperatures above 40°C and not to leave it near heat sources.
The "Handles" accessory is suitable for those with limited movement.
The product is the ideal solution for nurses and assistants who need to apply therapeutic and anti-embolic stockings, especially to bedridden patients.
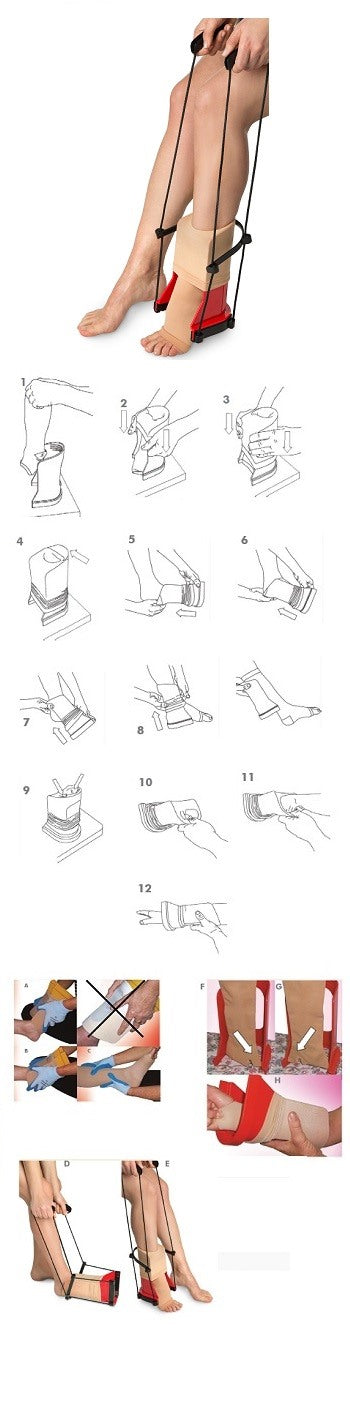
How to use
Wear rubber gloves with grip, to avoid damaging the sock.
Place the applicator on a secure surface at a comfortable height.
The oblong hole of the applicator should face you in a vertical position.
Making sure that the sock is not inside out, bring it inside the applicator so that the heel of the sock is on the side of the oblong hole (1).
Spread the sock at the level of the elastic at the top and without making it crease, place it on the upper edge of the and turn it over to slide it along the outer side of the same (3).
The operation must proceed until the heel of the sock reaches, in its central area, the upper edge of the product, in correspondence with the oblong hole (4).
At this point you are ready to wear or have someone wear the stocking.
How to put a sock on someone else
The operation requires that the oblong hole of the applicator corresponds with the side of the calf of the person who will wear the stocking.
It is recommended that the person sits or lies down.
When applying an open-toed sock, you need to take a special grip on the sock around the applicator to prevent it from slipping out of position while you put your foot on.
Insert your foot into the toe of the sock until your heel matches the sock.
Once the heel is well positioned, loosen the grip of your hands and begin to move the product up the foot and leg (A).
The sock will then slowly slide along the wall of the applicator (B) and leave it completely once it reaches just below the knee, whatever the length of the sock.
Now you can remove the applicator.
In the case of a reference other than the knee-high, you will be the one to arrange the rest of the sock, making the final positioning adjustments according to the instructions provided by the manufacturer of the sock.
Check that the heel and toe are positioned correctly and that the sock is at the right height.
How to put on your own stockings
Once the sock has been applied to the product, sit with your legs crossed and, leaving the product on the floor or holding it in your hand, insert the tip of your foot into the sock, blocking the heel of the sock with one hand (5).
Slide your foot until your heel coincides with the heel of the sock (6).
This way the heel will slide into the oblong hole (7).
As the product is worked up the foot and leg, the sock leaves the applicator to adhere to you (8).
If you need to wear a stocking that is longer than a knee-high, bring the product up to the base of the knee and remove the stocking from the applicator, which can then be slipped over the foot.
Using your hands, slide the rest of the sock until it is positioned correctly on the leg.
The "Handles" accessory can be a valid aid when carrying out the operation alone, especially for those who have difficulty maintaining balance or reaching their extremities (see next paragraph).
Wear it yourself using the handles
The "Handles" accessory is not mandatory, but can be very useful.
After applying the sock to the product, insert the 2 black plastic guides into the raised lower edge of the product.
Once the guides are inserted, rest the handles on the ground so that you can easily pick them up when putting on the sock.
Grasp the handles and place the product horizontally on the floor; insert your foot into the sock and pull slowly using the handles (D).
By extending the leg completely and continuing to slowly pull the handles, the heel will be guided into the oblong hole (E) and the sock will be put on as described in the previous section.
In particular, after the heel has entered the oblong hole, it is possible to bend the knee by placing the applicator and then the foot on the floor.
To remove the handles, you need to open the lever on the inside of the applicator with one hand and push the guide out with the other.
PLEASE NOTE: The handle accessory fits all three applicator sizes.
How to apply compression sleeves
Wear rubber gloves with grip, to avoid damaging the bracelet.
Place the applicator on a secure surface at a comfortable height.
The oblong hole of the applicator should face you in a vertical position.
When applying the bracelet to the product, position the opening for the fingers and thumb towards the bottom of the applicator (9).
It is necessary to pay attention to which arm the bracelet will be worn on to maintain the direction in which the palm of the hand should match the oblong hole (F right hand) (G left hand).
Fold the upper end of the cuff over the applicator and tighten it in the curved part (10), to prevent it from slipping when the other hand is inserted into the cuff itself (11).
Slide your hand and arm into the cuff and continue moving the product upwards (12).
It may be helpful to tighten the edge of the cuff that touches the palm of the hand (H), to prevent the cuff from misaligning on the arm.
This measure can be applied to gloveless bracelets or tubular bandages.
Cleaning
Wash the product with warm water and mild detergents.
If it is necessary to disinfect the applicator [it can be cleaned with a 70% isopropyl alcohol (white spirit) solution].
Do not use solvents and do not expose it to steam sterilization.
Do not place it in direct sunlight or near heat sources.
Format
Color: Black.
Size: Universal.
Code UHA-07246
The product is available in 3 sizes, distinguishable by color.
It is compact, lightweight, easily transportable, very easy to clean, sturdy and does not rust.
It is purchased only once and used for a long time, taking care not to expose it to temperatures above 40°C and not to leave it near heat sources.
The "Handles" accessory is suitable for those with limited movement.
The product is the ideal solution for nurses and assistants who need to apply therapeutic and anti-embolic stockings, especially to bedridden patients.
How to use
Wear rubber gloves with grip, to avoid damaging the sock.
Place the applicator on a secure surface at a comfortable height.
The oblong hole of the applicator should face you in a vertical position.
Making sure that the sock is not inside out, bring it inside the applicator so that the heel of the sock is on the side of the oblong hole (1).
Spread the sock at the level of the elastic at the top and without making it crease, place it on the upper edge of the and turn it over to slide it along the outer side of the same (3).
The operation must proceed until the heel of the sock reaches, in its central area, the upper edge of the product, in correspondence with the oblong hole (4).
At this point you are ready to wear or have someone wear the stocking.
How to put a sock on someone else
The operation requires that the oblong hole of the applicator corresponds with the side of the calf of the person who will wear the stocking.
It is recommended that the person sits or lies down.
When applying an open-toed sock, you need to take a special grip on the sock around the applicator to prevent it from slipping out of position while you put your foot on.
Insert your foot into the toe of the sock until your heel matches the sock.
Once the heel is well positioned, loosen the grip of your hands and begin to move the product up the foot and leg (A).
The sock will then slowly slide along the wall of the applicator (B) and leave it completely once it reaches just below the knee, whatever the length of the sock.
Now you can remove the applicator.
In the case of a reference other than the knee-high, you will be the one to arrange the rest of the sock, making the final positioning adjustments according to the instructions provided by the manufacturer of the sock.
Check that the heel and toe are positioned correctly and that the sock is at the right height.
How to put on your own stockings
Once the sock has been applied to the product, sit with your legs crossed and, leaving the product on the floor or holding it in your hand, insert the tip of your foot into the sock, blocking the heel of the sock with one hand (5).
Slide your foot until your heel coincides with the heel of the sock (6).
This way the heel will slide into the oblong hole (7).
As the product is worked up the foot and leg, the sock leaves the applicator to adhere to you (8).
If you need to wear a stocking that is longer than a knee-high, bring the product up to the base of the knee and remove the stocking from the applicator, which can then be slipped over the foot.
Using your hands, slide the rest of the sock until it is positioned correctly on the leg.
The "Handles" accessory can be a valid aid when carrying out the operation alone, especially for those who have difficulty maintaining balance or reaching their extremities (see next paragraph).
Wear it yourself using the handles
The "Handles" accessory is not mandatory, but can be very useful.
After applying the sock to the product, insert the 2 black plastic guides into the raised lower edge of the product.
Once the guides are inserted, rest the handles on the ground so that you can easily pick them up when putting on the sock.
Grasp the handles and place the product horizontally on the floor; insert your foot into the sock and pull slowly using the handles (D).
By extending the leg completely and continuing to slowly pull the handles, the heel will be guided into the oblong hole (E) and the sock will be put on as described in the previous section.
In particular, after the heel has entered the oblong hole, it is possible to bend the knee by placing the applicator and then the foot on the floor.
To remove the handles, you need to open the lever on the inside of the applicator with one hand and push the guide out with the other.
PLEASE NOTE: The handle accessory fits all three applicator sizes.
How to apply compression sleeves
Wear rubber gloves with grip, to avoid damaging the bracelet.
Place the applicator on a secure surface at a comfortable height.
The oblong hole of the applicator should face you in a vertical position.
When applying the bracelet to the product, position the opening for the fingers and thumb towards the bottom of the applicator (9).
It is necessary to pay attention to which arm the bracelet will be worn on to maintain the direction in which the palm of the hand should match the oblong hole (F right hand) (G left hand).
Fold the upper end of the cuff over the applicator and tighten it in the curved part (10), to prevent it from slipping when the other hand is inserted into the cuff itself (11).
Slide your hand and arm into the cuff and continue moving the product upwards (12).
It may be helpful to tighten the edge of the cuff that touches the palm of the hand (H), to prevent the cuff from misaligning on the arm.
This measure can be applied to gloveless bracelets or tubular bandages.
Cleaning
Wash the product with warm water and mild detergents.
If it is necessary to disinfect the applicator [it can be cleaned with a 70% isopropyl alcohol (white spirit) solution].
Do not use solvents and do not expose it to steam sterilization.
Do not place it in direct sunlight or near heat sources.
Format
Color: Black.
Size: Universal.
Code UHA-07246
Product Details
Product Details
-
Legislative class
-
Deductible Product